This guide walks you through setting up and configuring our Jewelry label printer (Model TSC TC300).
Make sure you have the following at hand before starting the setup:
A Windows computer (10/11)
An available USB port.
TSC TC300 Printer with power supply and USB cable.
Printdesk is installed
Download the full product manual here.
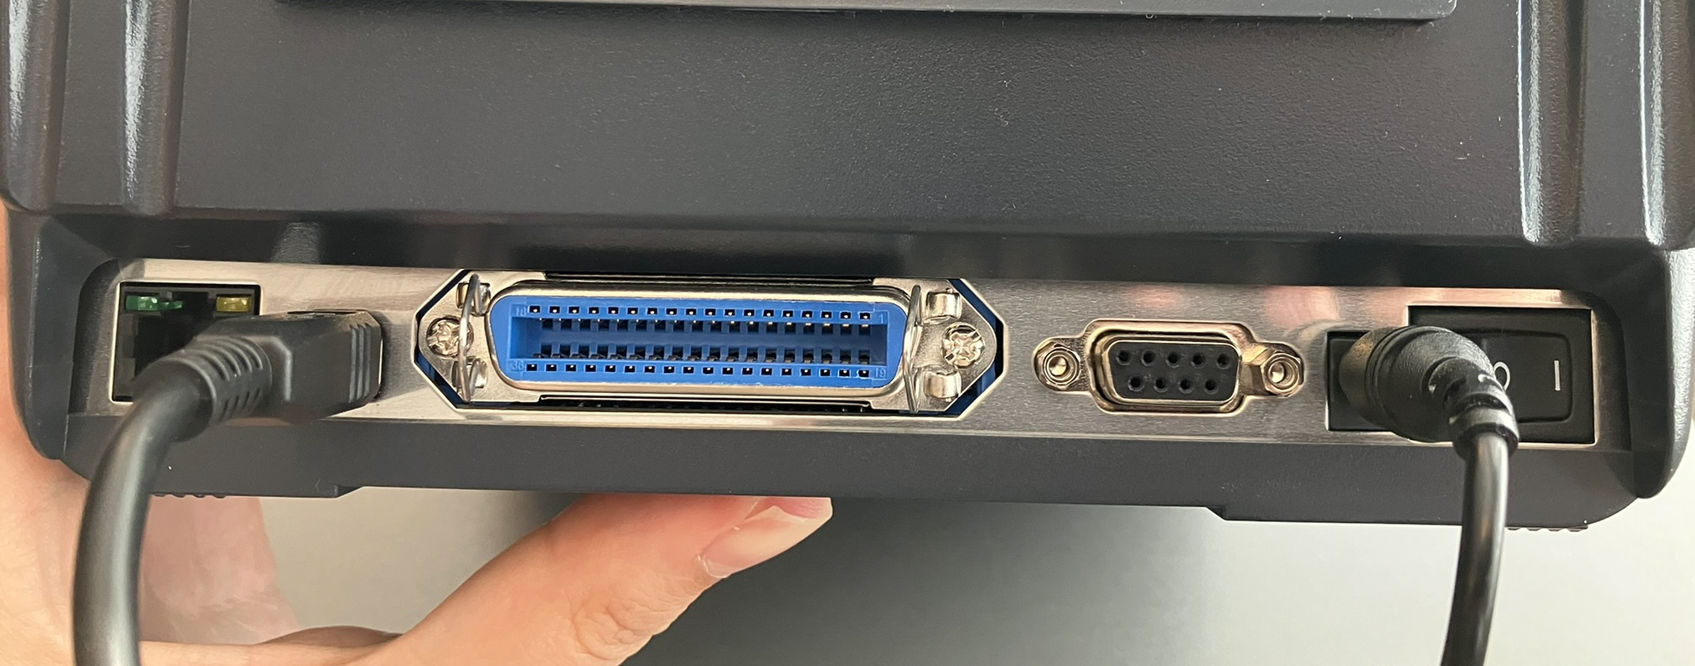
Connect the printer to power using the supplied 24V power adapter.
Next, you need to connect the printer with the included USB printer cable, which plugs directly into the back of the printer and into your computer's USB port
You can also connect the printer using the network port on the back, so it can be used on several computers, but that's not covered by this guide and is at your own risk! We won't help with setting this up.
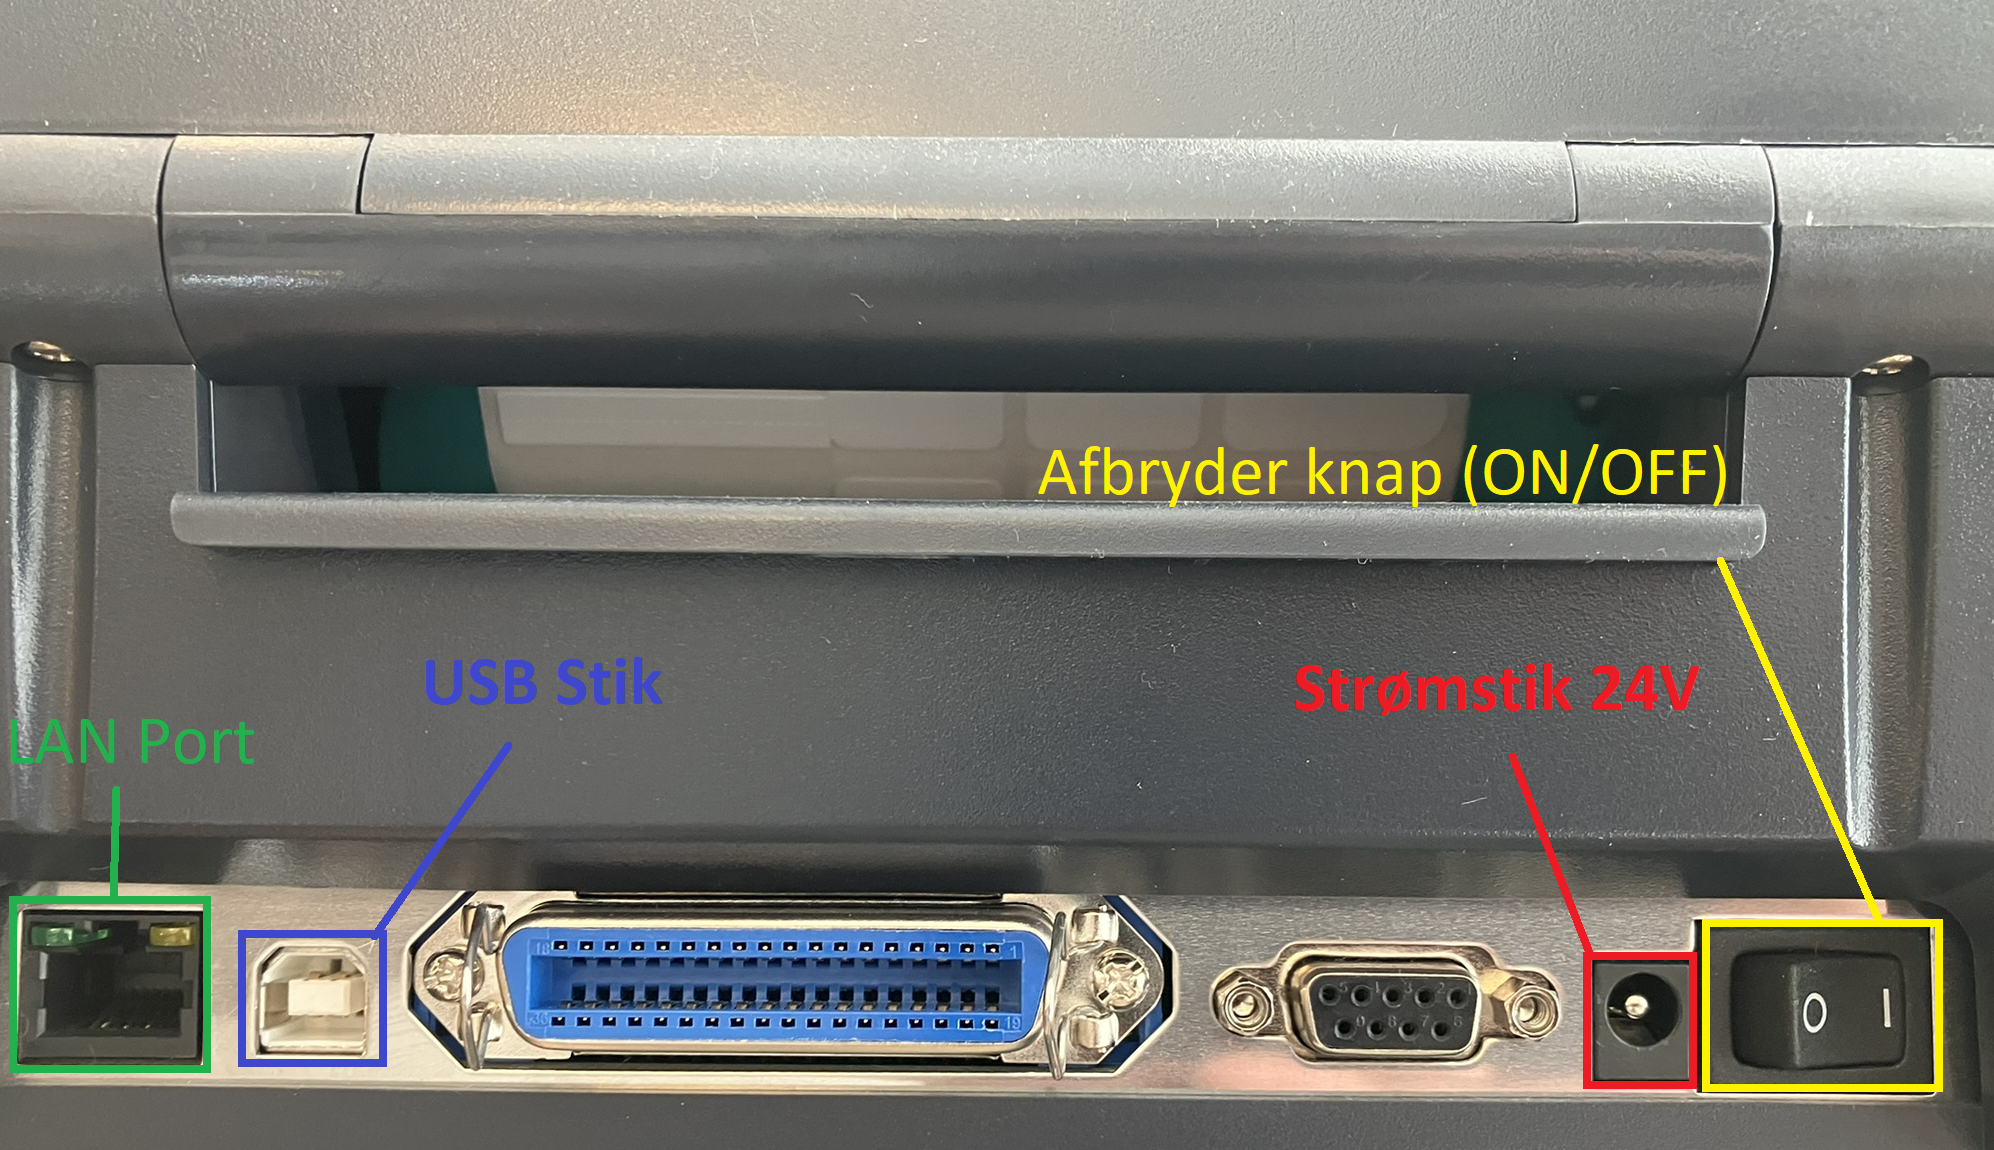
Port overview (from left to right)
LAN Port (RJ-45)
USB 2.0 (type B)
Parallel port (not used)
Serial port, RS232 (not used)
24V DC Power input
Power switch (main switch)
In this case, we just connect the printer with the included USB cable.
You can also connect the printer via the network (LAN). Just plug a LAN cable from your router into the printer’s LAN port (RJ-45 port) on the back.
Before you can set up the printer to run via LAN, you need to connect it with USB the first time and then run a program that switches the printer to network mode, so it gets an IP address.
NB: Only connect the printer with a LAN cable if you have at least a basic understanding of how networks and IP addresses work.
Download TSC Diagtool (Official site)
Download TSC Diagtool (Backup link)
Open DiagTool.exe as administrator.
Set the language to English if it hasn’t already been selected automatically.
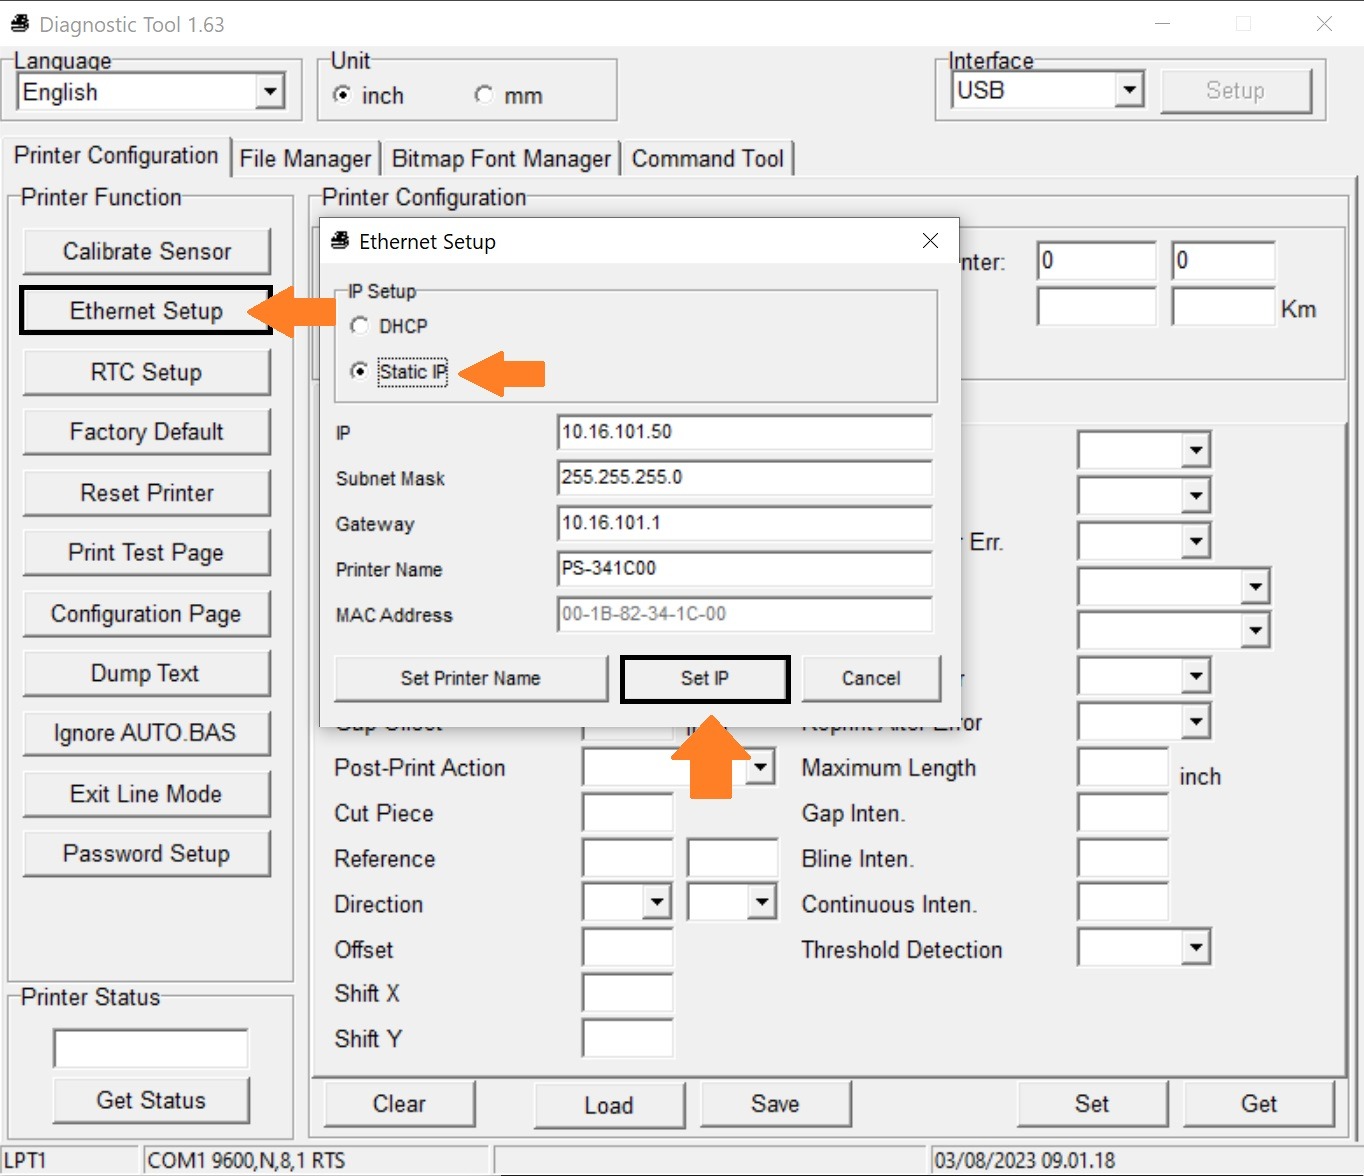
Click on Ethernet setup on the left.
In the dialog box, select Static IP.
Now fill out the IP info to match your scope in your local network. (Make sure the printer’s IP isn’t one that’s already in use!)
Once you’ve filled in the right IP, subnet mask and gateway, you can click Set.
Before you can use the printer, you need to install the right printer driver.
Just a heads-up: this printer only works on Windows computers running Windows 10 64-bit or newer.
TSC TC300 Printer Driver (Official Page)
You can also get the printer driver from our backup link (Backup)
Make sure to connect the printer with the included USB cable and turn on the device before you start installing the printer driver.
Then just follow the installation instructions as guided by the installer.
Once the driver installation is done, you'll need to restart your computer and maybe plug your USB cable back into the printer, then it should pop up in your Windows printer list named 'TSC-TC300'
You need to use special jewelry labels and a type of carbon paper for this printer, you can order it from our webshop.
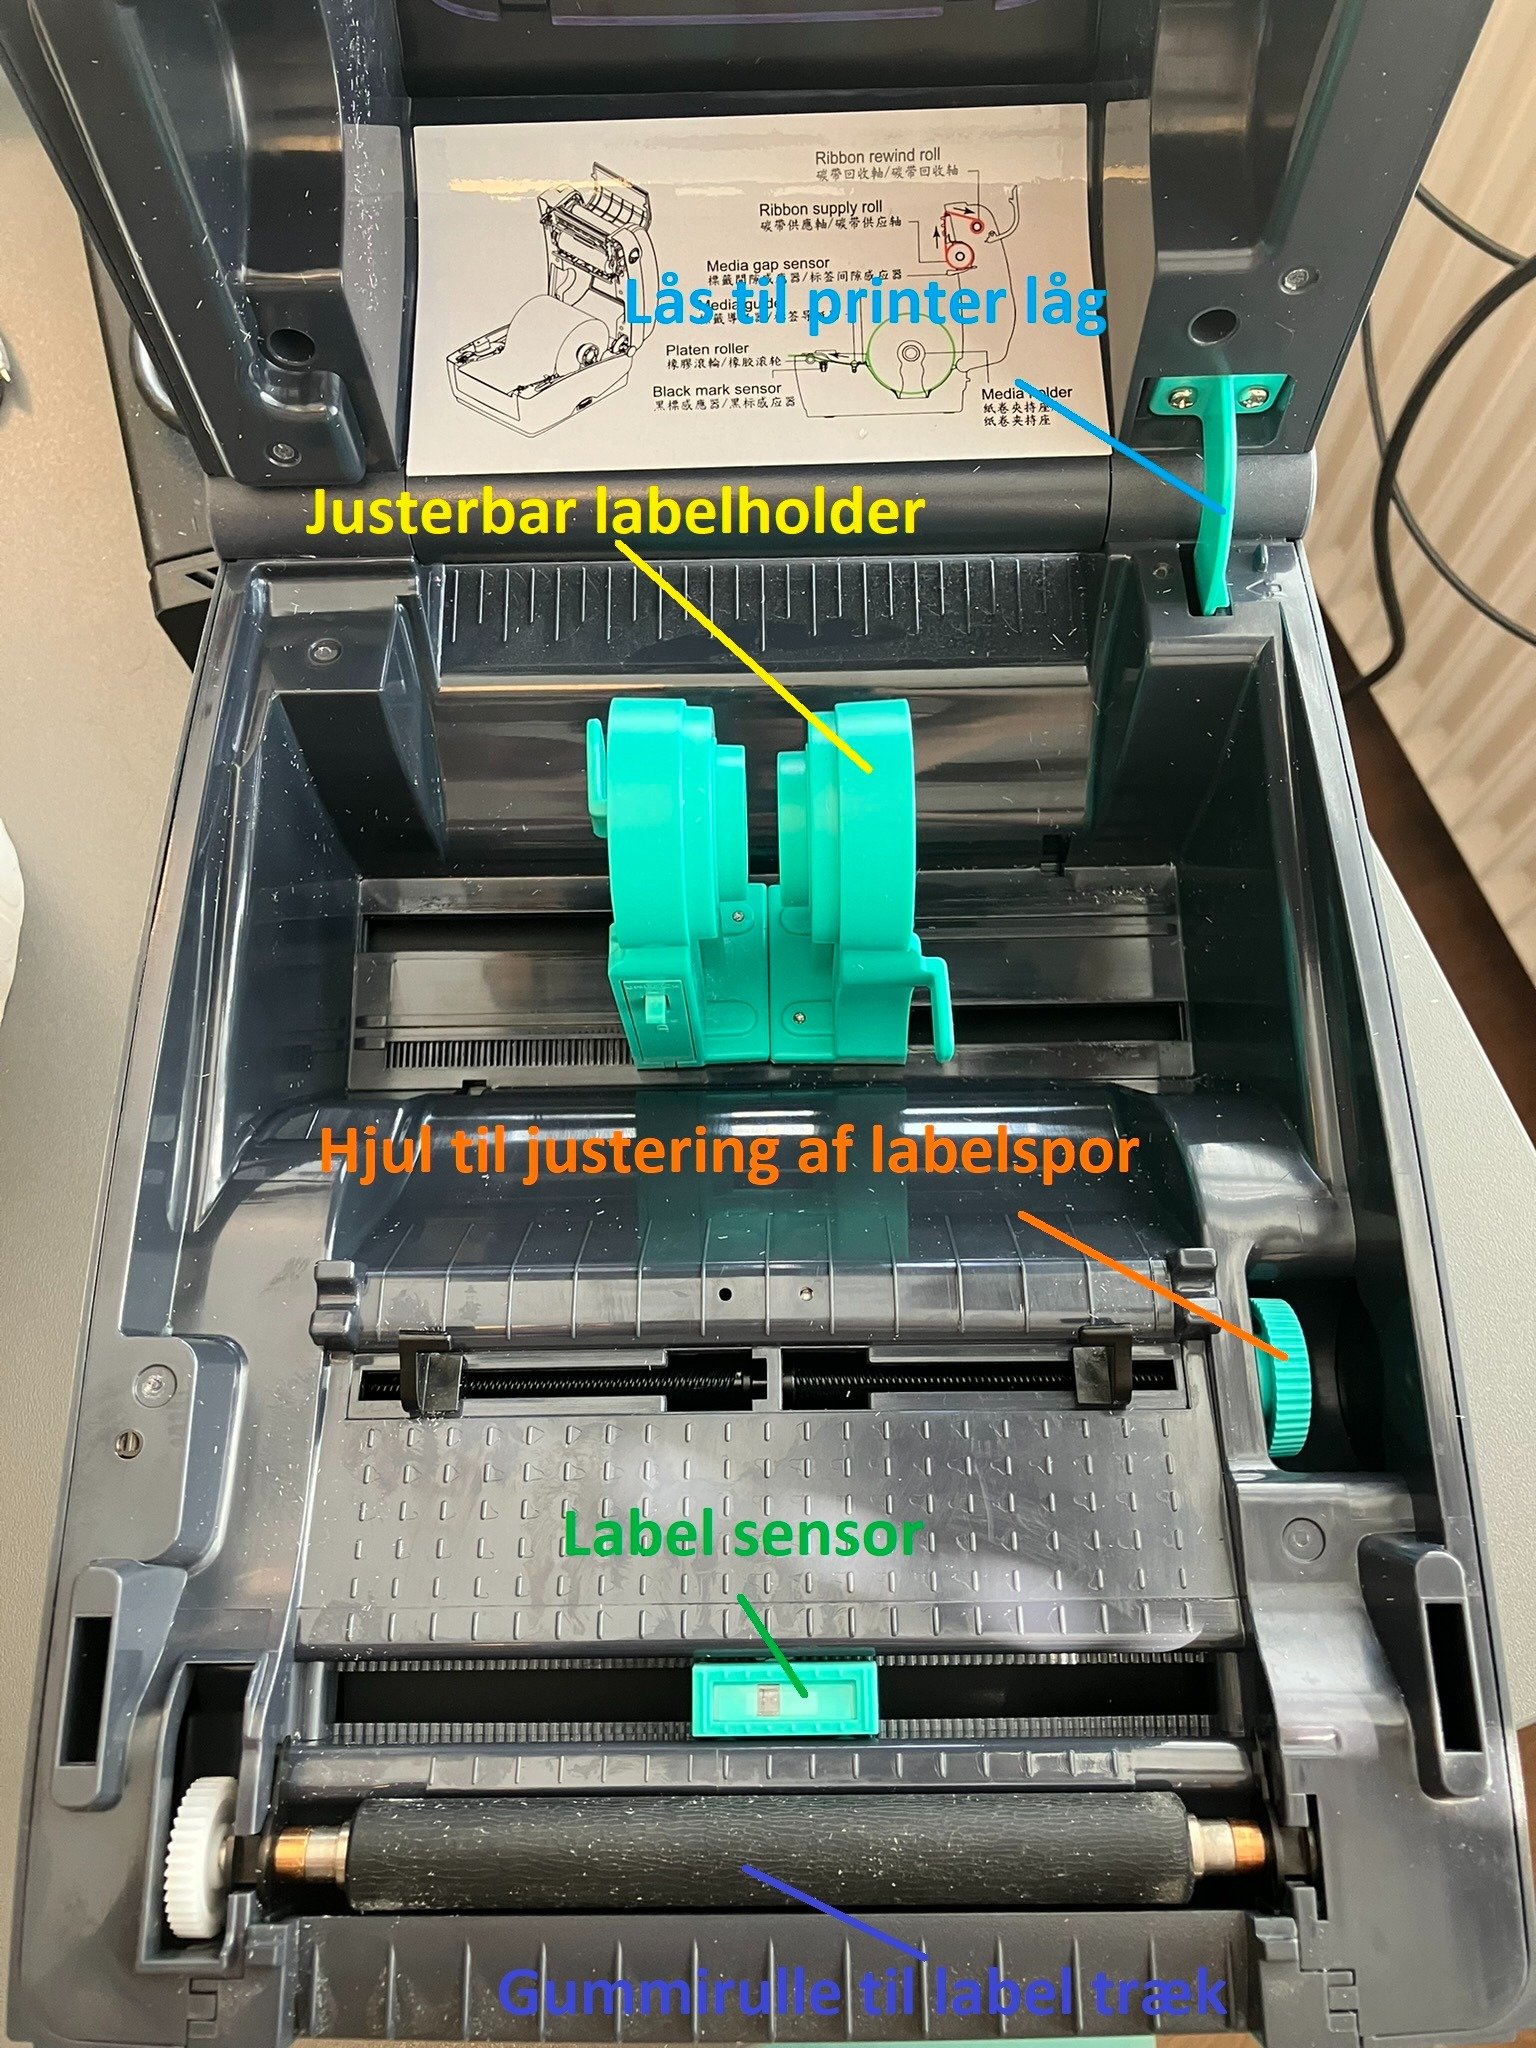
Open the printer by pressing the two side buttons towards you at the same time, so the top unlocks and you can lift it up.
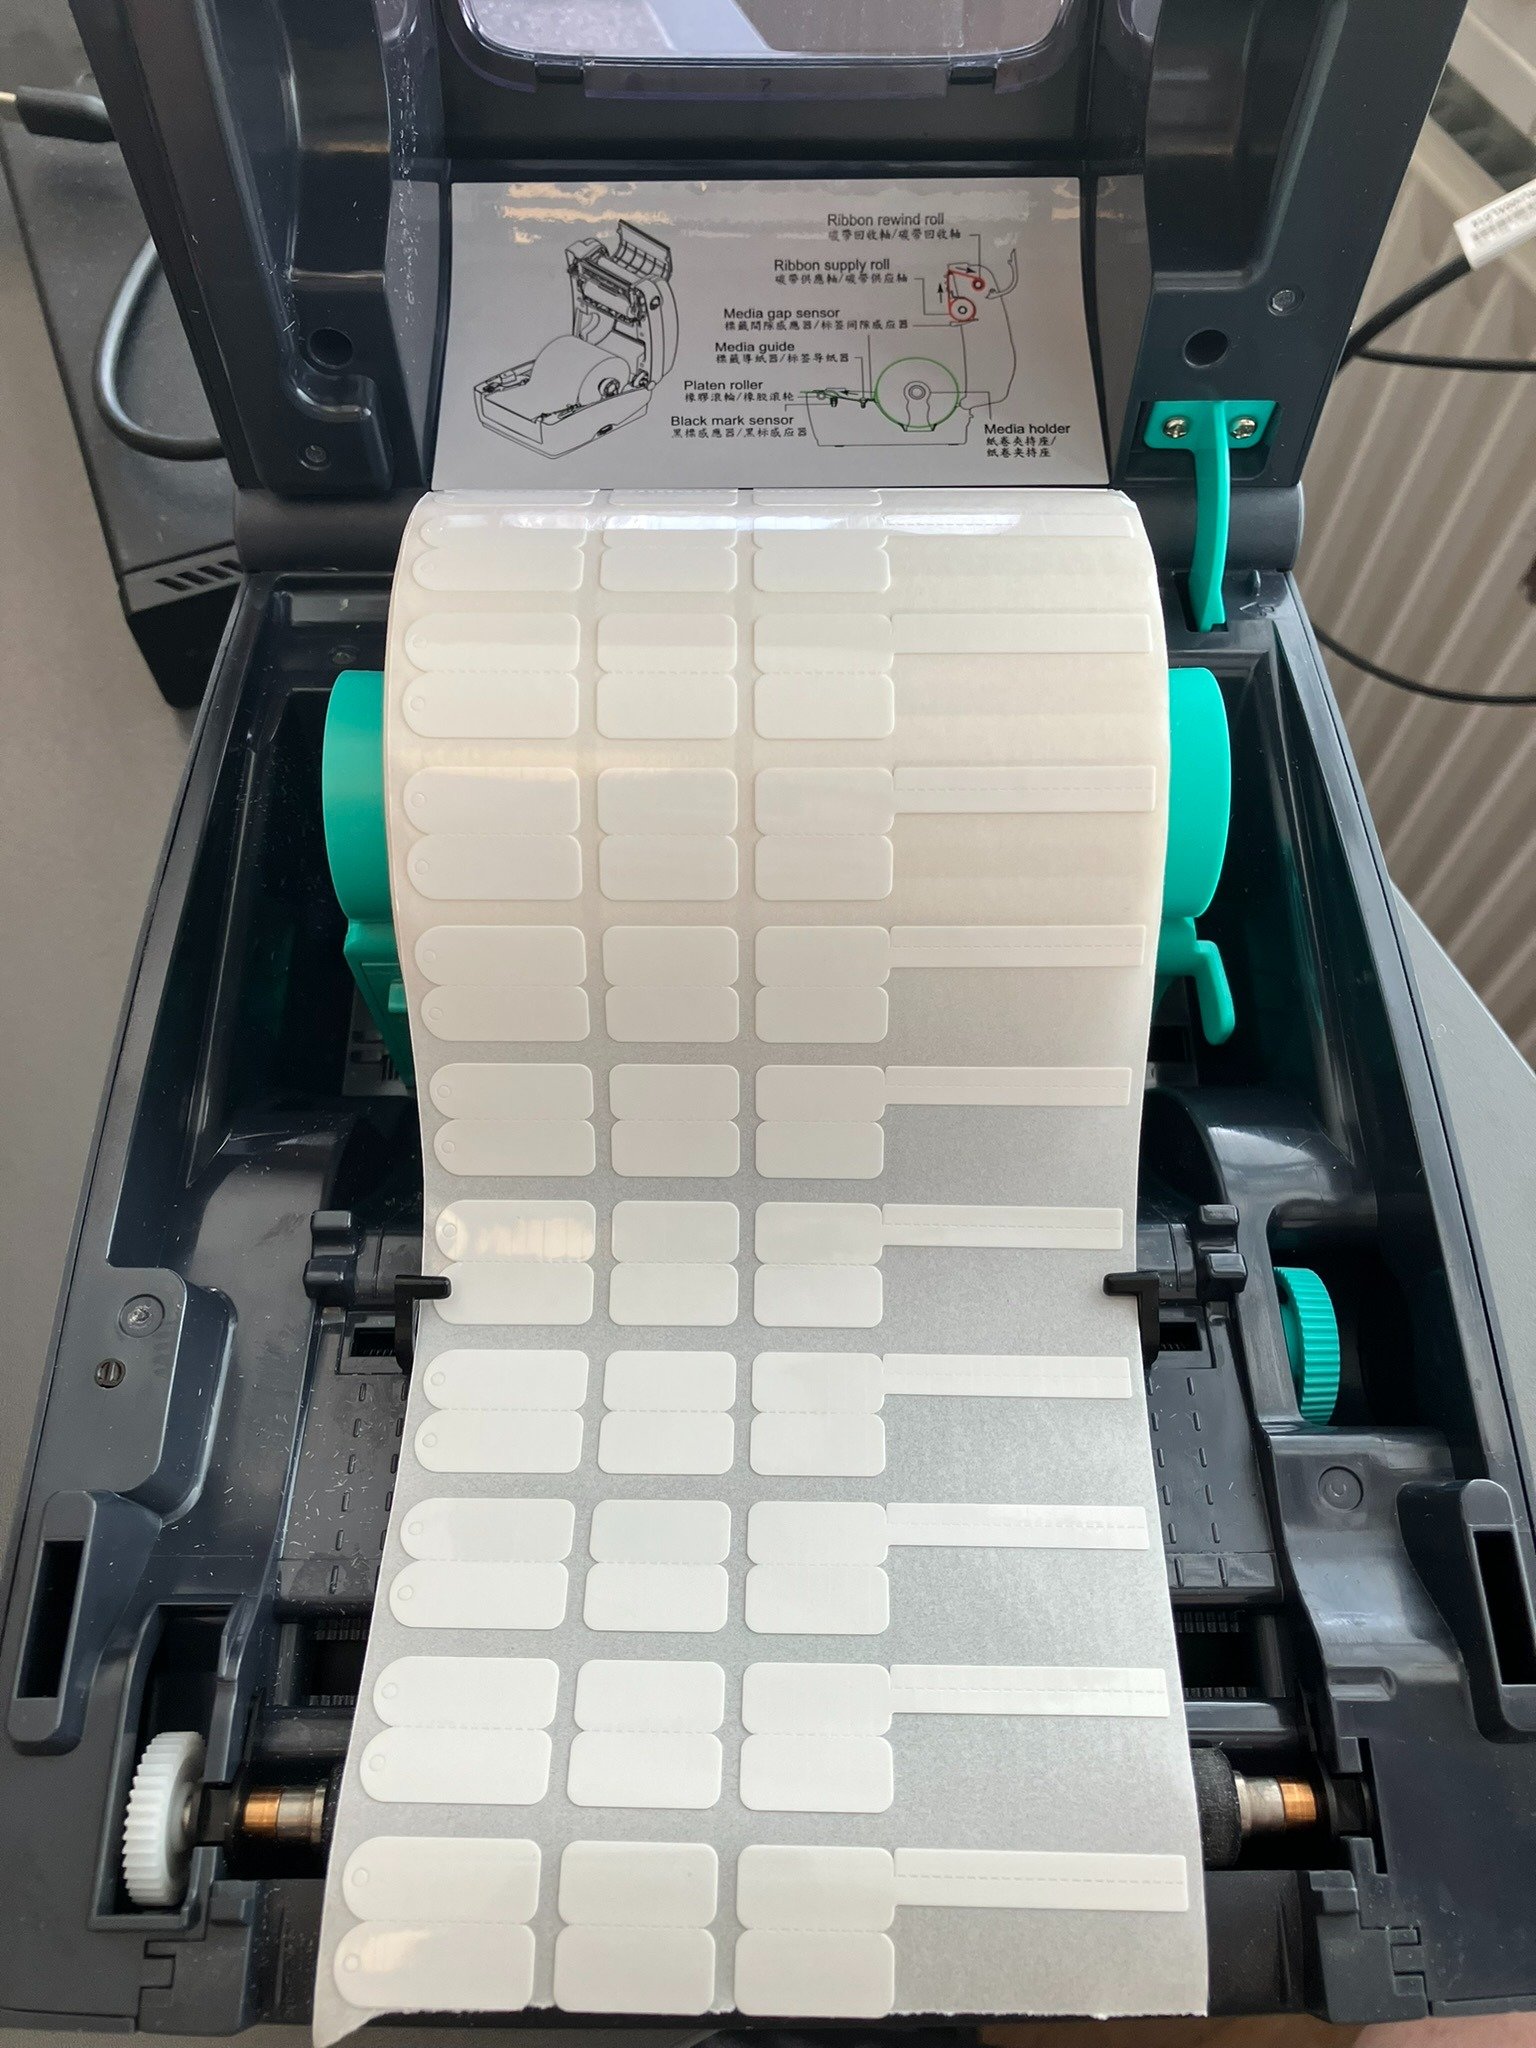
Next, you can insert your label roll onto the holder by sliding the holder arms aside so there's space for the label roll, and mount it on the pin in the center of the roll. *Marked with yellow*
Pull the end of the roll out of the printer so it reaches the rubber roller at the front. *Marked with purple*
Make sure the sides of the label roll are between the adjustable holder, which can be loosened or tightened using the wheel on the right. *Marked with orange*
This makes sure the label roll doesn't feed through crooked, but stays in a straight line the whole way.
Set the label sensor so it's definitely in the center under your label. *Marked with green*
This video from TSC can be used as a guide — but it doesn't show the label type used for jewelry in the video, even though the steps are pretty much the same.
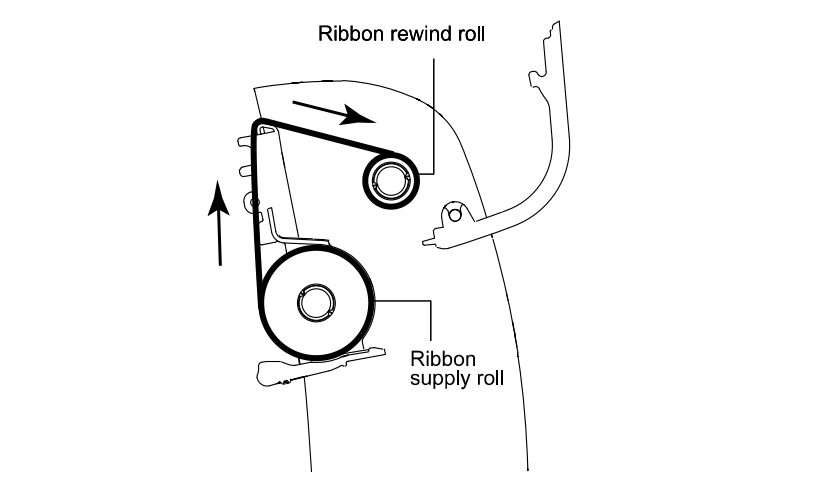
When the top of the printer is open, you can open the upper shield that's on the front.
Here you put the included empty cardboard roll that you use to wind up the used carbon paper. The holder is spring-loaded so you need to push it a bit to the right to make space for the roll. After that you can turn the roll around until it fits tight on the holder and turns with the holder the right way.
After this, you can open your new roll of carbon paper and put it in place on the lower spool holder, which is located just below and is accessible from the inside of the printer.
For more pictures and details, check out the printer manual on page 24-26.
The first time you set up the printer on your device, you need to do an extended calibration so the printer knows what type of label is loaded and what size it is.
You also do this via TSC's DiagTool:
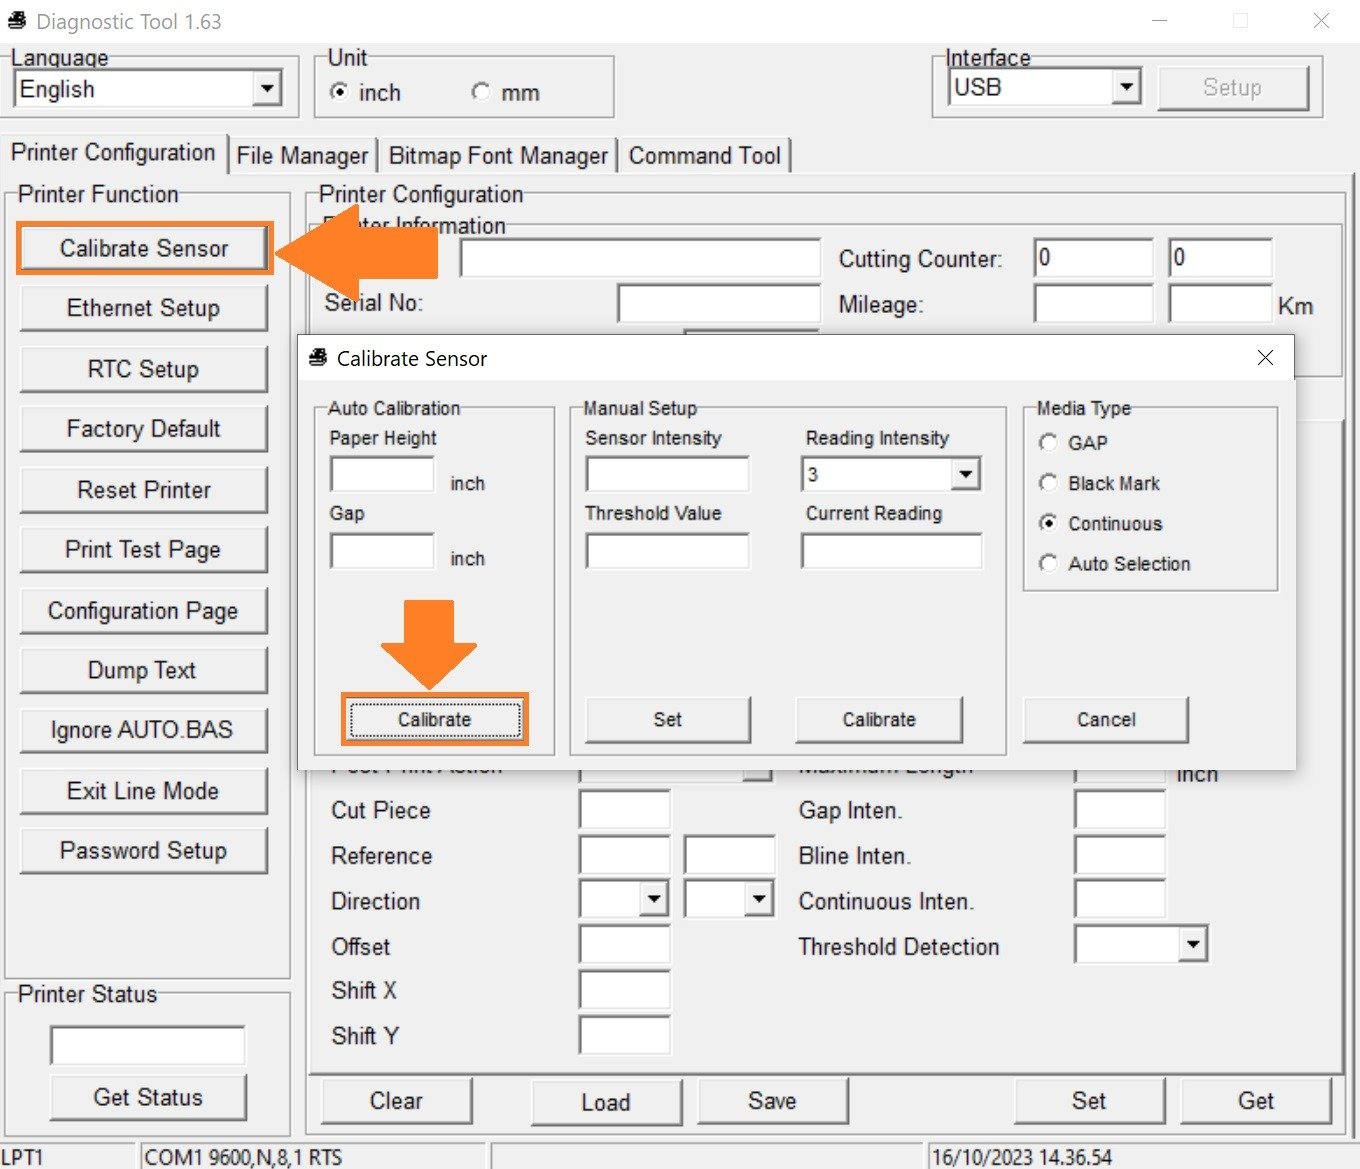
Open DiagTool.exe as administrator.
Set Unit to mm. (Metric measurement) at the top.
Select Calibrate Sensor on the left.
Press the Calibrate button to start printer calibration. You don't need to enter anything into the fields for this process, since the printer measures the size itself in mm.
The printer moves the labels back and forth and uses about 4-7 rows of labels for this, and nothing is printed on the labels.
When the printer is done, you can close this tool again.
It's important to calibrate the printer every time you change the label and/or carbon ribbon to make sure it's still set up and printing right.
But you don't always have to use DiagTool for this, as most of the time you can just do a basic calibration that you can activate directly on the printer:
Do a basic calibration:
Turn off the printer via the switch on the back (set it to 0)
Hold down the Feed button on the printer while turning it back on (round button to the left of the LED indicator)
Wait until the printer goes from orange to red light and count 5 red blinks before you let go of the feed button.
After this, the printer will do a basic calibration.

Note: If the printer doesn't calibrate and spits out blank labels, you let go of the feed button too late and need to start over. The printer doesn't print on the labels during calibration.
Before you can print properly on labels from C 1ST, you need to specify the label dimensions in the printer driver to tell Windows what size/format you're printing on.
Open Printers and Scanners in Windows.
Find the printer in the list (by default it’s called TSC TC300)
Click Manage under the printer.
Choose Print Preferences in the menu.
Under Stock click New and create a new template type.
Call it 'Jewelry' and enter the following details*
Label Size Width: 106 mm.*
Label Size Height: 18 mm.*
*Depends on your label, but this fits our type.
You don't need to change anything else here.
Press OK to save.

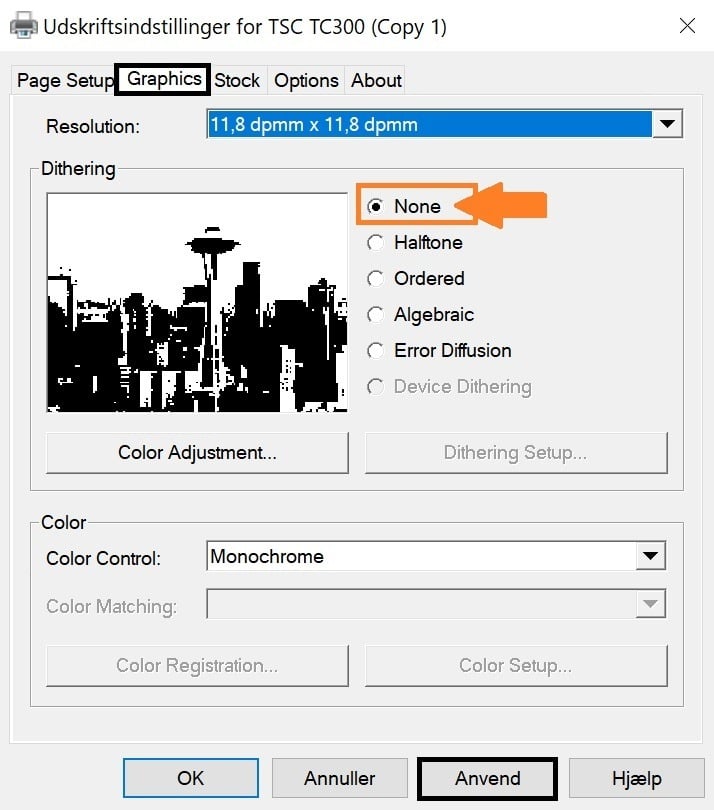
Set the following settings under the Graphics section in the driver. Hit Apply to save.
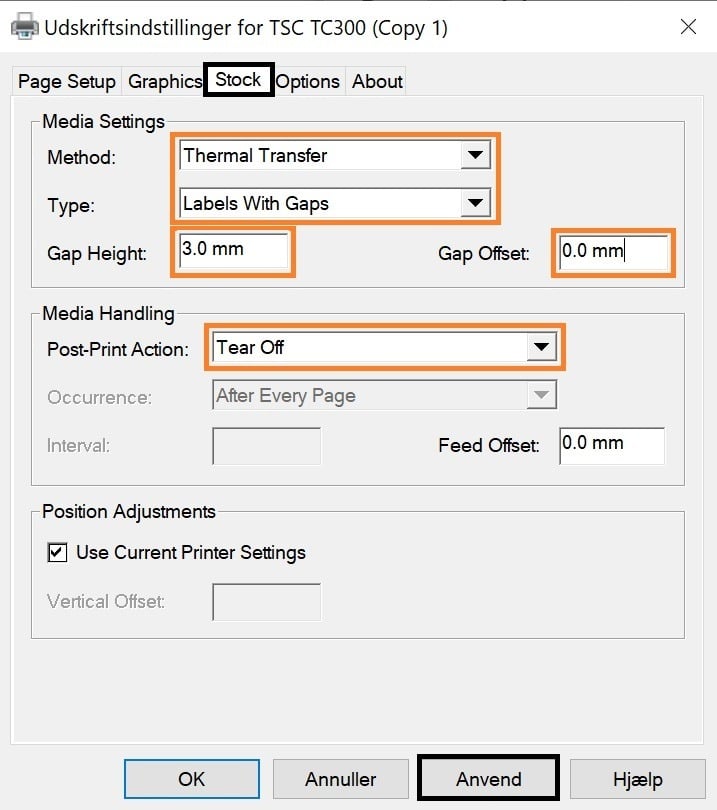
The following settings should be set under Stock in the driver. Tap Apply to save.
Method: Thermal Transfer
Type: Labels With Gaps
Gap Height: 3 mm.*
Gap Offset: 0 mm.
Post-Print Action: Tear Off
�*Might be different for other labels. Please measure yourself.
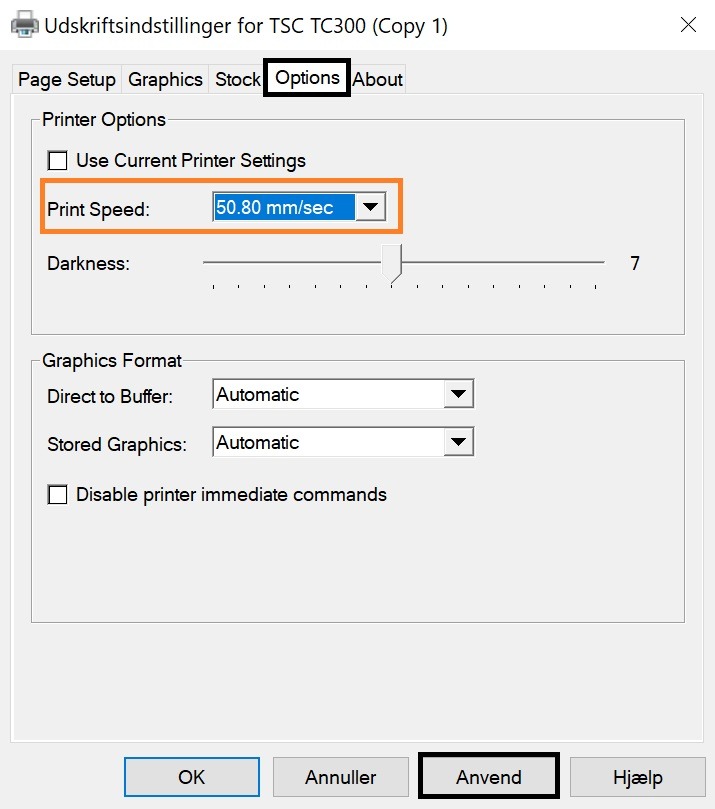
The following settings should be set under Options in the driver. Tap Apply to save.
Print Speed: 50.80 mm/sec
Darkness: Leave on default (7) and only adjust if the print isn't clear enough.
Log in to your C 1ST app on your computer and go to Settings -> Print.
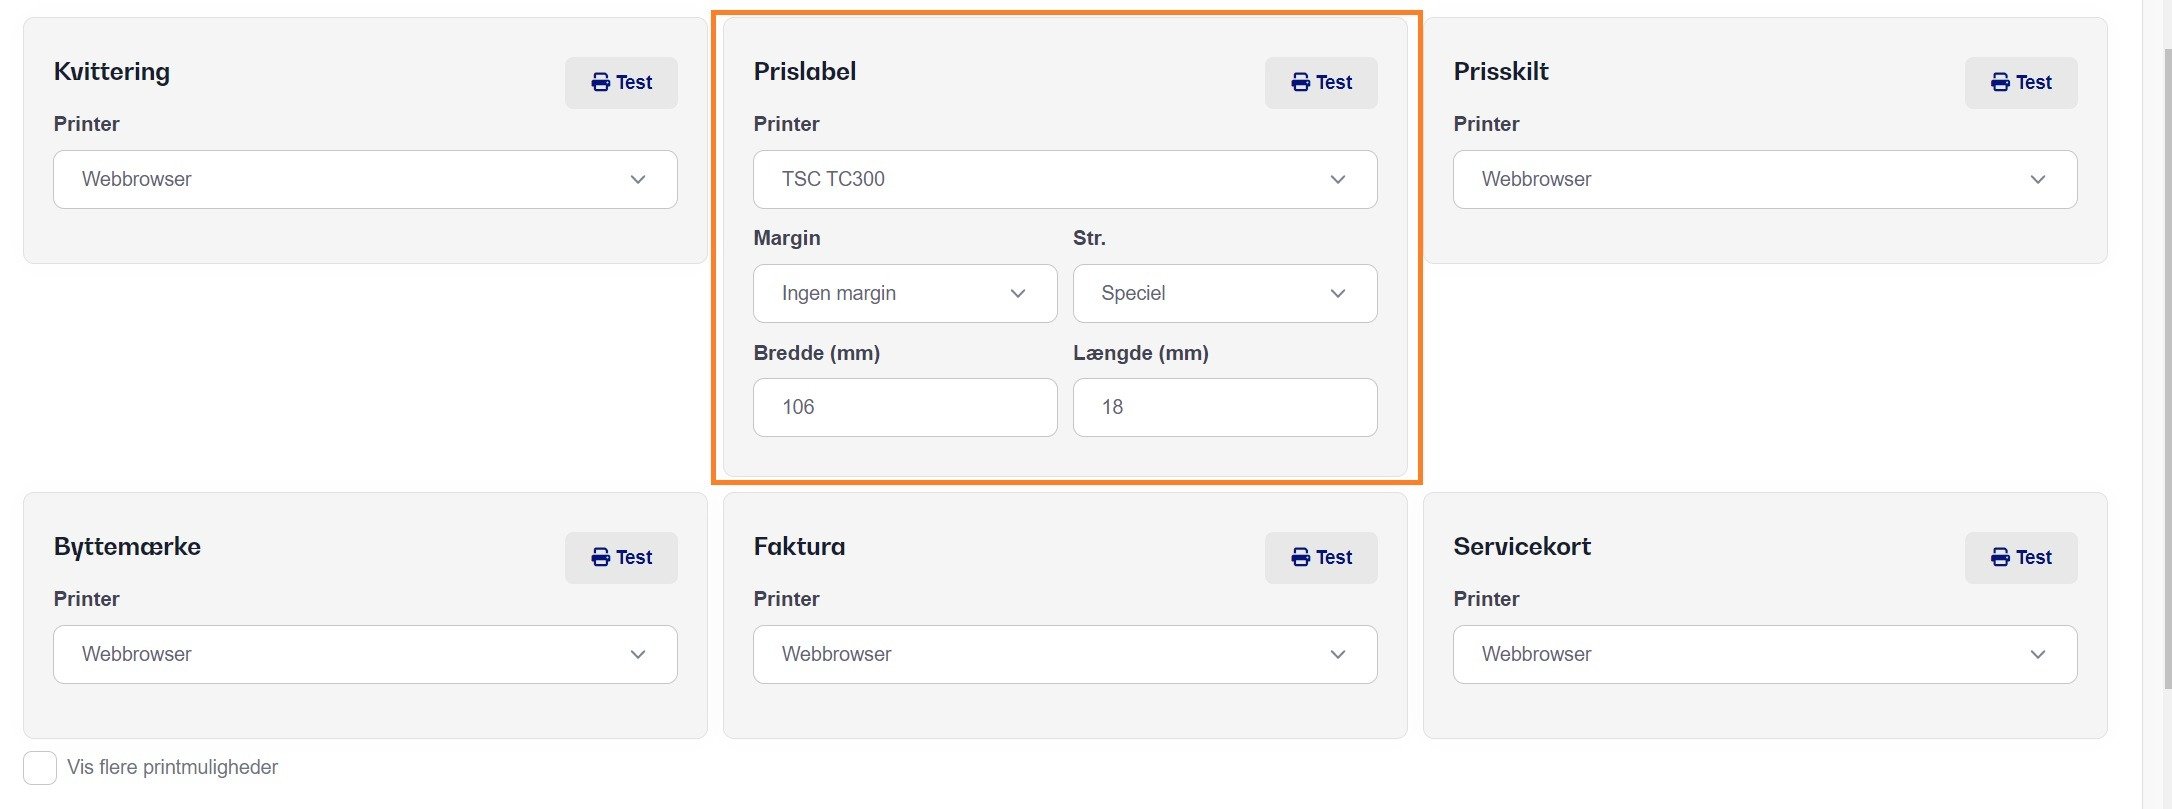
Under the Price Label section, pick your TSC TC300 label printer.
If you can't see your label printer in the drop-down list, make sure you've installed our print client. Get help installing Printdesk here.
Enter the following:
Margin: No margin
Size: Custom
Width: 106 mm.
Length (Height): 18 mm.
Note: These settings are only saved locally on your device, so if you set your printer up for LAN to print from multiple computers, you'll need to do this again on each device.
Most of the time you'll need to nudge and shift the print a bit so it lands exactly on your label and is perfectly straight.
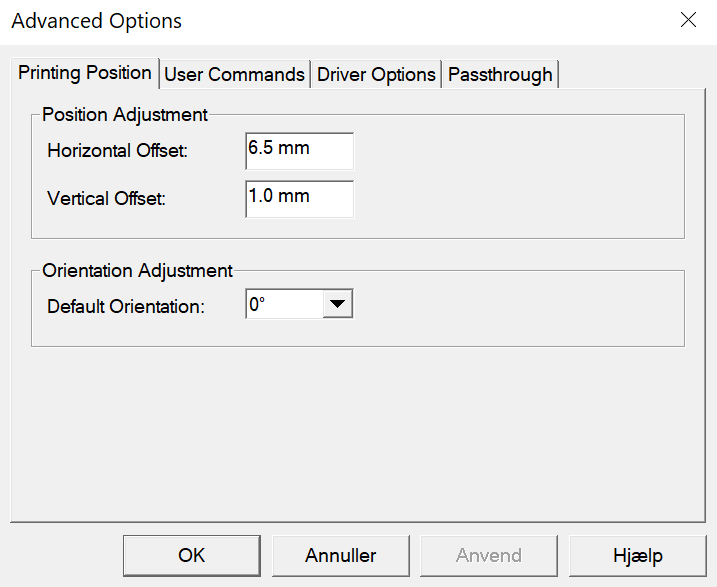
You do this in the print settings and by clicking the Advanced Options button.
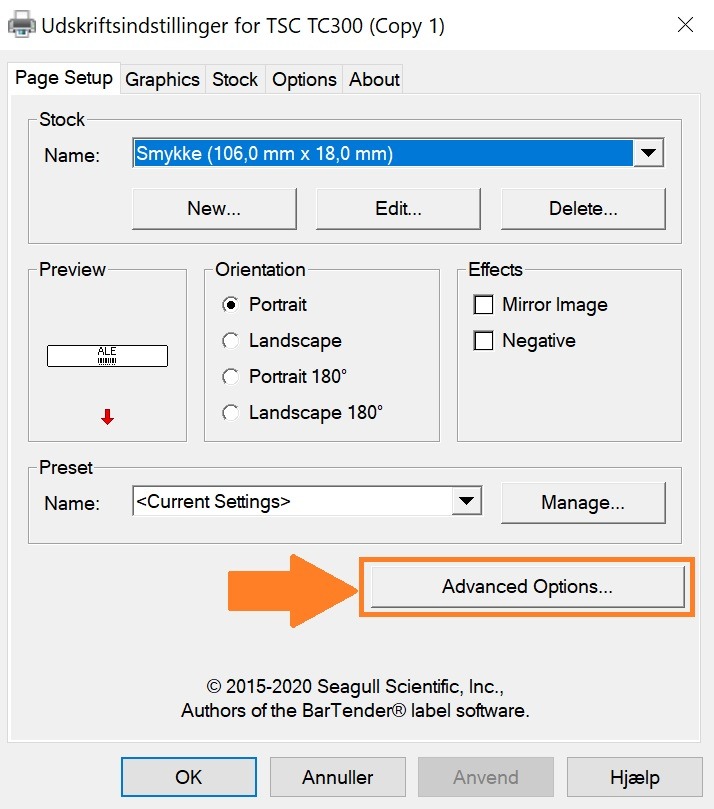
Here you'll usually need to use trial-and-error to find the perfect adjustments, since this can vary a lot. In my case, I've found that setting Horizontal Offset to 6.5 mm and Vertical Offset to 1 mm works.
You might have to adjust by 1 mm at a time, then save and print a new label from C 1ST to see the result of your change.
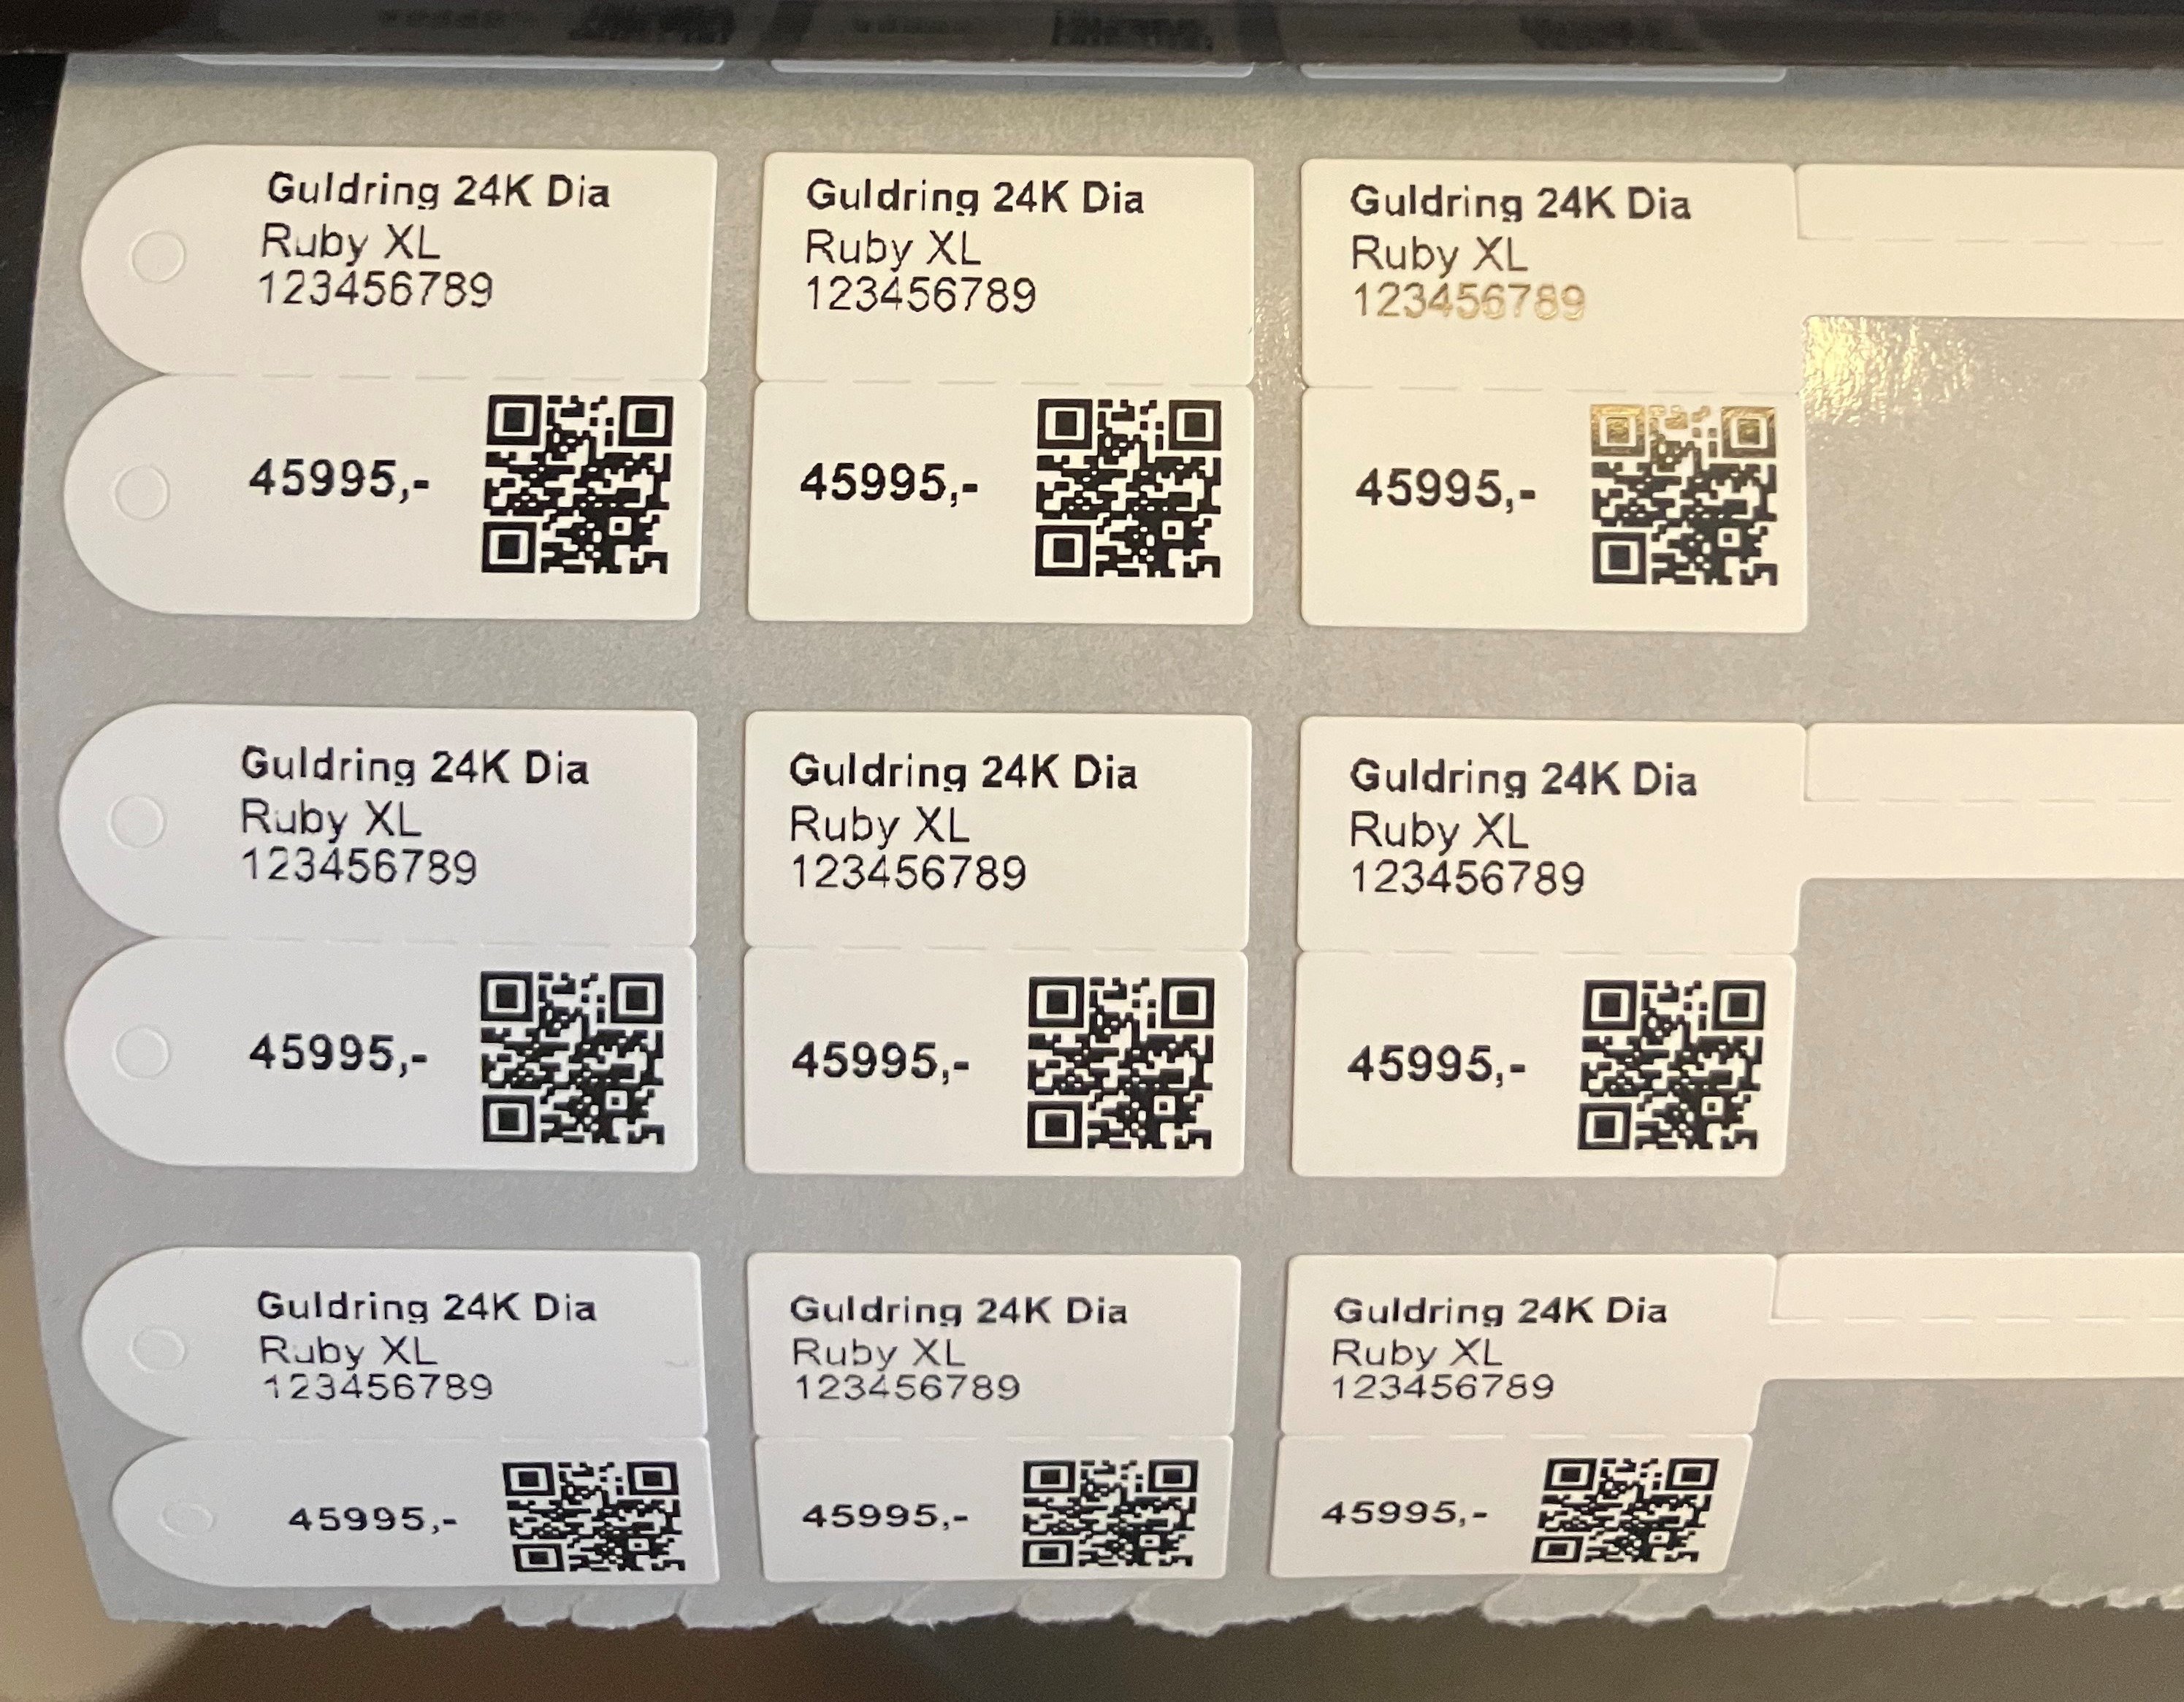
There are two types of templates for our jewelry labels:
Jewelry label with QR code (Recommended)
Jewelry label with regular barcode (Supports up to 8-digit barcode)
The code just has to be inserted into the Pricelabel template under our print templates.
{{title}}
{{color}} {{size}} {{#each productFiels}} {{value}}{{/each}}
{{productno}}
{{price}},-
{{qrsvg barcode 34 34}}
{{title}}
{{color}} {{size}} {{#each productFiels}} {{value}}{{/each}}
{{productno}}
{{price}},-
{{qrsvg barcode 34 34}}
{{title}}
{{color}} {{size}} {{#each productFiels}} {{value}}{{/each}}
{{productno}}
{{price}},-
{{qrsvg barcode 34 34}}
Kommer snart!
When you print your jewelry labels, make sure everything is visible and we recommend having 0.5-1mm white space around the QR code to ensure it's easy to scan.
Note: Remember to test your (QR) barcodes with your scanner to make sure they scan easily. If all settings are correct, you should be able to scan the codes on the labels really quickly.
Keep in mind you’ll need a 2D-compatible barcode scanner to read QR codes.
If you don't have one yet, you can buy one through our webshop.