To succeed with your loyalty program, it's important to be well-prepared and decide how you want to structure the program. To keep it as simple as possible, this guide assumes that all enrolled customers receive the same benefits. If you want memberships where different groups receive different benefits, it’s easy to set up once you’ve gone through the initial setup.
The guide is divided into three phases for easier navigation:
Preparation
Daily Use
Maintenance of Enrolled Customers
First, you need to decide what benefits your enrolled customers will receive as part of your loyalty program. It sounds more complicated than it is!
Go to Customers and select Customer Club in the top right corner of the screen.
Then choose Customer Club Campaigns and click Create Customer Club Campaign.
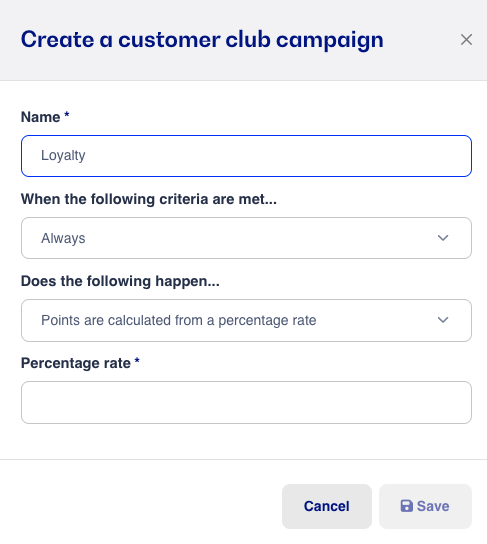
In the window that opens, you can select various criteria. Fill in the following:
Name: Give your campaign an appropriate name. You might create a special campaign during peak season that gives your most loyal customers a bigger bonus for shopping with you. It is possible to have multiple campaigns at the same time, so make sure to choose a name that makes it easy for you to manage your campaigns.
When the following criteria are met: Here you can choose between "Always," so all customers in the program earn points on equal terms, or "The customer belongs to the following customer group." The latter is used if you have different levels and want to give a 5% bonus to some groups and 10% to others.
Does the following happen: Define whether points are awarded based on a percentage or if points are not awarded. It may be beneficial to exclude certain customer groups if, for example, points should not be awarded to business customers.
Percentage: Enter the percentage of the sales amount that the customer should earn in points. For example, if set to 1%, the customer earns points equivalent to 1 krone per 100 kroner spent in the store. This way, you can control the value of the customer's points.
After preparation and creating the necessary campaigns, you’re ready to enroll your first customer into your customer club. The easiest way is to do it directly at the register by adding a customer and clicking Enroll.
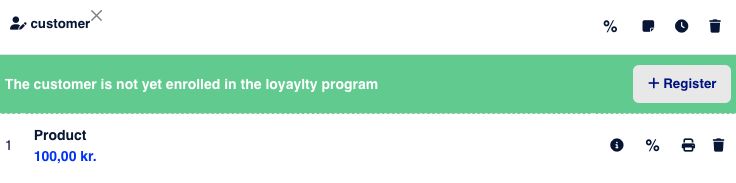
Once the customer is enrolled, or if the customer is already enrolled, you will see the customer's current points balance and how many points the customer will earn on the current sale instead of the enrollment option.
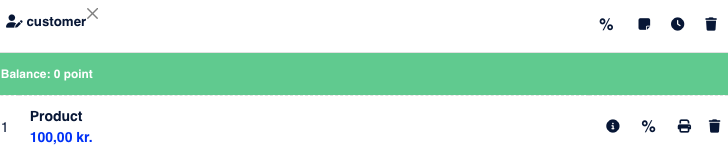
When the customer has paid, they earn points immediately.
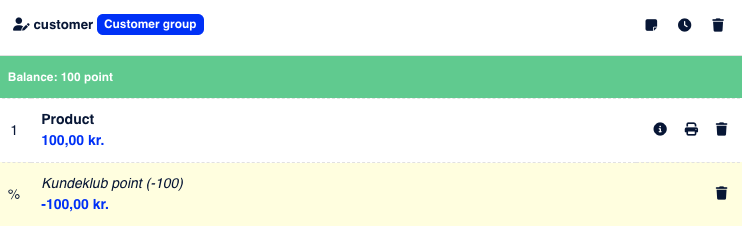
For example, if the customer has earned 100 points, they have 100 DKK to spend in the store. When the customer returns to shop and is added to the register, there is now a Use Points button. By pressing Use Points, the cashier decides how many of the customer’s points should be used for the current sale.
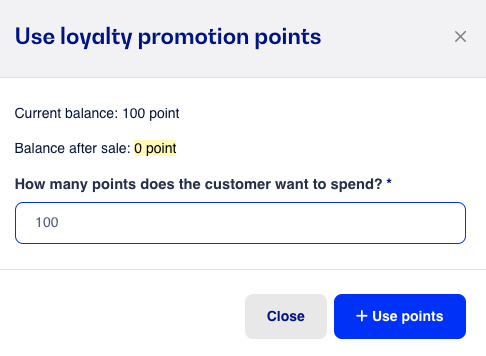
Once decided, the value is deducted from the total sale, allowing the customer to pay the difference and receive a discount on the purchased item.
Payment of the remaining amount can, of course, be made through all the options normally available in the store.
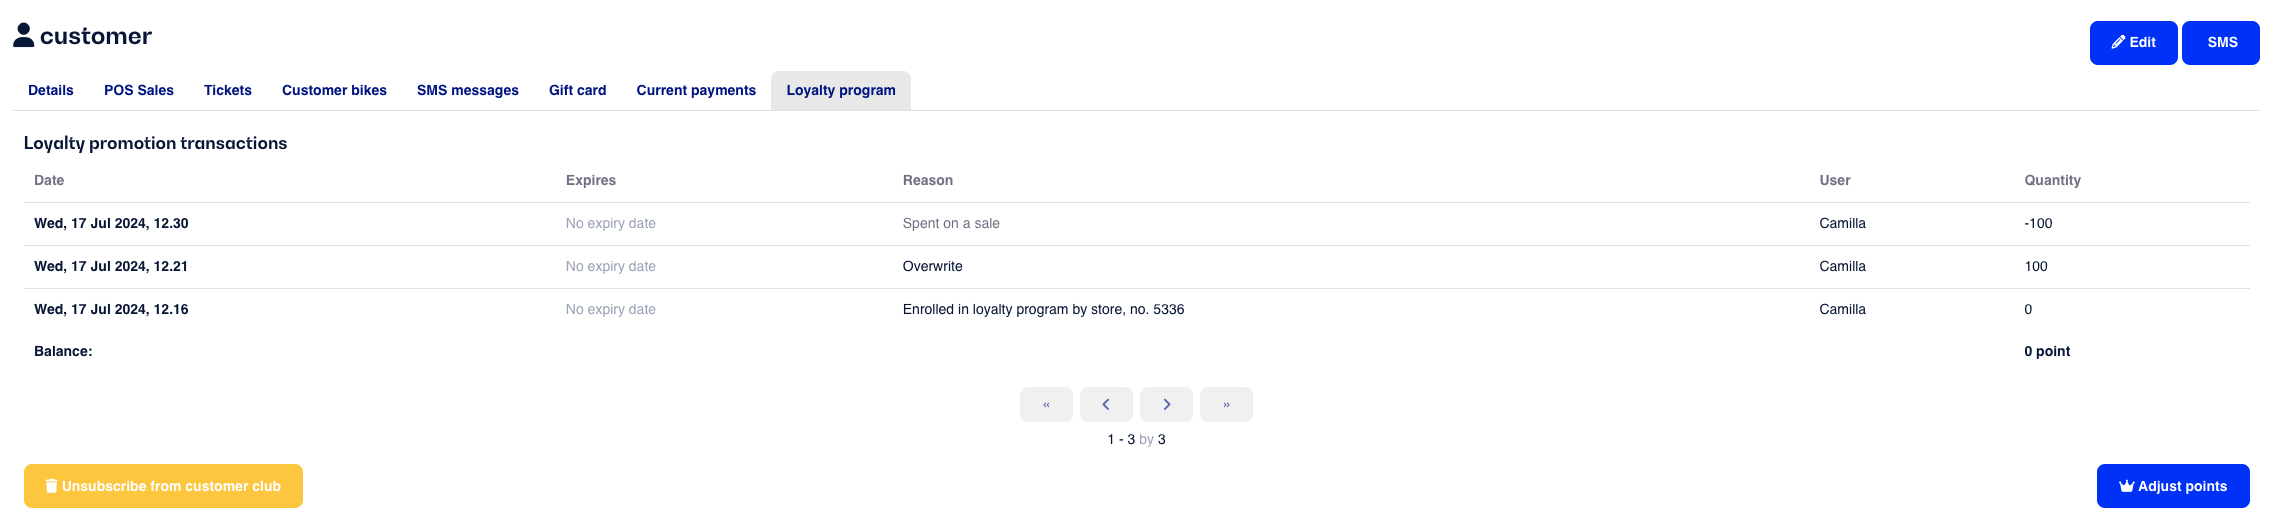
There are several ways to maintain your customer club and ensure the loyalty program is used as intended. By going to Customer Club as shown in the guide, you can immediately see a list of members and their current points balance.

By clicking on an individual customer, you can see an overview of their actions within the customer club. You can see exactly when the customer earned points and when they used them. It is also possible to manually add points to the customer's balance if, for example, a sale was completed but the customer wasn’t added at the register, or if the customer should receive bonus points in connection with a competition.
This is also where you can remove a customer from the loyalty program.
Before you start using the module, you need to enable it for your account in C1st/Bikedesk. If you’re unsure how to do this, contact support via email, and we’ll be ready to help you. If you're unsure how to create your first campaign, we can also assist with setting up the customer club. Prices for the module and setup can be found here.
Adding to the Receipt
To make it easier for customers to keep track of their points, we’ve created a small code snippet that can be added to the receipt print template. Simply insert the following into the template where you want the text to appear:
#{{#if loyaltypointssum}} Customer Club #{{loyaltypointssum}} points were earned on this receipt Your balance is now #{{ payment.customer.loyaltypointsbalance}} points #{{/if}} #{{#unless payment.customer.loyalty_member_since}} Join our customer club and enjoy many benefits, come to the store to learn more #{{/unless}}
This will result in two different outcomes on the receipt:
If the customer is part of the customer club:

If the customer is not part of the customer club:

If you want to call your points something else or phrase it differently, you can, of course, adjust the text as needed.
